Developer Guide
Table of contents
- Table of contents
- Acknowledgements
- Setting up, getting started
- Design
-
Implementation
- Adding a person
- Editing a contact
- Adding the attendance of a student
- Adding assignments to all students
- Adding the grade of a student
- Editing the availability of a TA
- Editing the roles of a Professor
- Filter by tutorial group
- Display details of contacts in secondary panel
- Multiple Teacher’s Address Books (TABs)
- Documentation, logging, testing, configuration, dev-ops
- Appendix: Requirements
- Appendix: Instructions for manual testing
- Appendix: Effort
Acknowledgements
- This project is built upon the AddressBook Level-3 project created as part of the SE-EDU Initiative.
- Libraries used: JavaFX, Jackson, JUnit 5
Setting up, getting started
Refer to the guide Setting up and getting started.
Design
.puml files used to create diagrams in this document can be found in the diagrams folder. Refer to the PlantUML Tutorial at se-edu/guides to learn how to create and edit diagrams.
Architecture

The Architecture Diagram given above explains the high-level design of the App.
Given below is a quick overview of main components and how they interact with each other.
Main components of the architecture
Main has two classes called Main and MainApp. It is responsible for,
- At app launch: Initializes the components in the correct sequence, and connects them up with each other.
- At shut down: Shuts down the components and invokes cleanup methods where necessary.
Commons represents a collection of classes used by multiple other components.
The rest of the App consists of four components.
-
UI: The UI of the App. -
Logic: The command executor. -
Model: Holds the data of the App in memory. -
Storage: Reads data from, and writes data to, the hard disk.
How the architecture components interact with each other
The Sequence Diagram below shows how the components interact with each other for the scenario where the user issues the command delete 1.

Each of the four main components (also shown in the diagram above),
- defines its API in an
interfacewith the same name as the Component. - implements its functionality using a concrete
{Component Name}Managerclass (which follows the corresponding APIinterfacementioned in the previous point.
For example, the Logic component defines its API in the Logic.java interface and implements its functionality using the LogicManager.java class which follows the Logic interface. Other components interact with a given component through its interface rather than the concrete class (reason: to prevent outside component’s being coupled to the implementation of a component), as illustrated in the (partial) class diagram below.

The sections below give more details of each component.
UI component
The API of this component is specified in Ui.java

The UI consists of a MainWindow that is made up of parts e.g.CommandBox, ResultDisplay, PersonListPanel, StatusBarFooter etc. All these, including the MainWindow, inherit from the abstract UiPart class which captures the commonalities between classes that represent parts of the visible GUI.
The UI component uses the JavaFx UI framework. The layout of these UI parts are defined in matching .fxml files that are in the src/main/resources/view folder. For example, the layout of the MainWindow is specified in MainWindow.fxml
The UI component,
- executes user commands using the
Logiccomponent. - listens for changes to
Modeldata so that the UI can be updated with the modified data. - keeps a reference to the
Logiccomponent, because theUIrelies on theLogicto execute commands. - depends on some classes in the
Modelcomponent, as it displaysPersonobject residing in theModel.
Logic component
API : Logic.java
Here’s a (partial) class diagram of the Logic component:

How the Logic component works:
- When
Logicis called upon to execute a command, it uses theAddressBookParserclass to parse the user command. - This results in a
Commandobject (more precisely, an object of one of its subclasses e.g.,AddCommand) which is executed by theLogicManager. - The command can communicate with the
Modelwhen it is executed (e.g. to add a person). - The result of the command execution is encapsulated as a
CommandResultobject which is returned back fromLogic.
The Sequence Diagram below illustrates the interactions within the Logic component for the execute("delete 1") API call.

DeleteCommandParser should end at the destroy marker (X) but due to a limitation of PlantUML, the lifeline reaches the end of diagram.
Here are the other classes in Logic (omitted from the class diagram above) that are used for parsing a user command:

How the parsing works:
- When called upon to parse a user command, the
AddressBookParserclass creates anXYZCommandParser(XYZis a placeholder for the specific command name e.g.,AddCommandParser) which uses the other classes shown above to parse the user command and create aXYZCommandobject (e.g.,AddCommand) which theAddressBookParserreturns back as aCommandobject. - All
XYZCommandParserclasses (e.g.,AddCommandParser,DeleteCommandParser, …) inherit from theParserinterface so that they can be treated similarly where possible e.g, during testing.
Model component
API : Model.java

The Model component,
- stores the address book data i.e., all
Personobjects (which are contained in aUniquePersonListobject). - stores the currently ‘selected’
Personobjects (e.g., results of a search query) as a separate filtered list which is exposed to outsiders as an unmodifiableObservableList<Person>that can be ‘observed’ e.g. the UI can be bound to this list so that the UI automatically updates when the data in the list change. - stores a
UserPrefobject that represents the user’s preferences. This is exposed to the outside as aReadOnlyUserPrefobjects. - does not depend on any of the other three components (as the
Modelrepresents data entities of the domain, they should make sense on their own without depending on other components)
Tag list in the AddressBook, which Person references. This allows AddressBook to only require one Tag object per unique tag, instead of each Person needing their own Tag objects.
Storage component
API : Storage.java

The Storage component,
- can save both address book data and user preference data in json format, and read them back into corresponding objects.
- inherits from both
AddressBookStorageandUserPrefStorage, which means it can be treated as either one (if only the functionality of only one is needed). - depends on some classes in the
Modelcomponent (because theStoragecomponent’s job is to save/retrieve objects that belong to theModel)
Common classes
Classes used by multiple components are in the seedu.addressbook.commons package.
Implementation
This section describes some noteworthy details on how certain features are implemented.
Adding a person
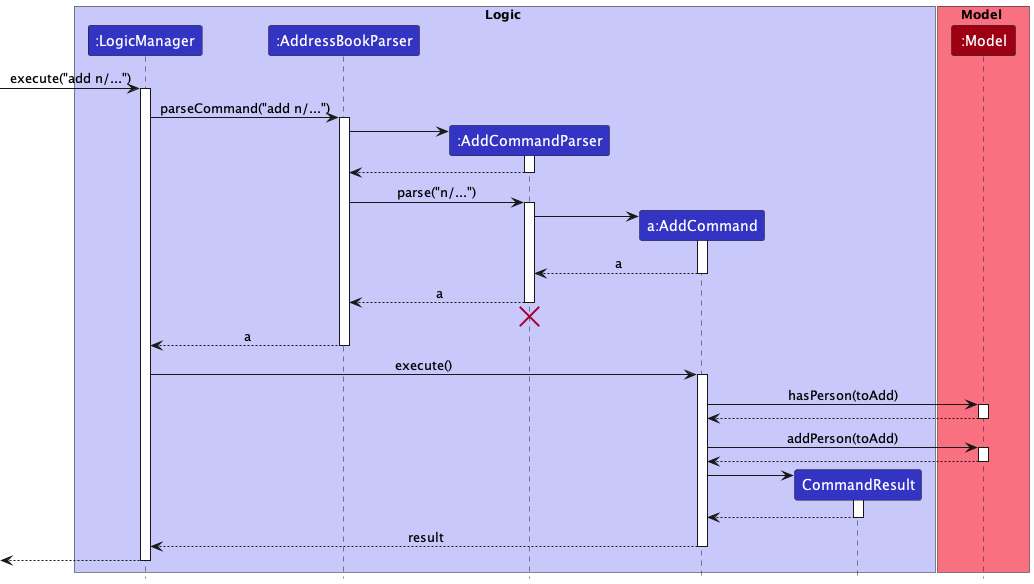
In TAB, the addition of a new Person(contact) is facilitated by the AddCommand command. AddCommand extends the abstract Command class,
where it overrides the Command#execute method to add in new contacts whenever called.
Implementation
- The user input to add a
Personto TAB, is passed to and executed byLogicManager, which callsAddressBookParser#parseCommandto instantiate aAddCommandParser. - The
AddCommandParser#parsewill return aAddCommand, provided the user input is valid. -
LogicManagerwill then call theCommand#executemethod ofAddCommand, creating a newPersonthroughModel#addPersonmethod. - Upon successful execution of the command, a message will be displayed to the user, by returning a
CommandResulttoLogicManager.
The sequence diagram below illustrates how the command to add a Person works:
Editing a contact
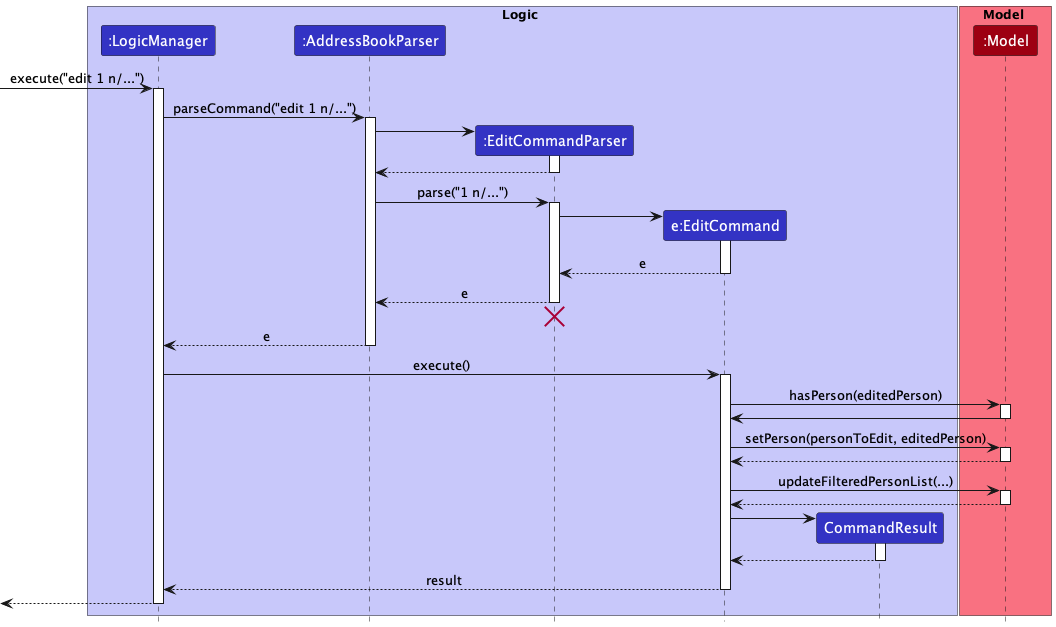
The editing of a contact’s details in TAB is facilitated by the EditCommand command. EditCommand extends the abstract Command class,
where it overrides the Command#execute method to edit details of contacts whenever called.
Implementation
- The user input to edit a contact on TAB, is passed to and executed by
LogicManager, which callsAddressBookParser#parseCommandto instantiate aEditCommandParser. - The
EditCommandParser#parsewill return aEditCommand, provided the user input is valid. -
LogicManagerwill then call theCommand#executemethod ofEditCommand, replacing the oldPersonwith a modifiedPersonthroughModel#setPersonmethod. - Upon successful execution of the command, a message will be displayed to the user, by returning a
CommandResulttoLogicManager.
The sequence diagram below illustrates how the command to edit a Person works:
Adding the attendance of a student
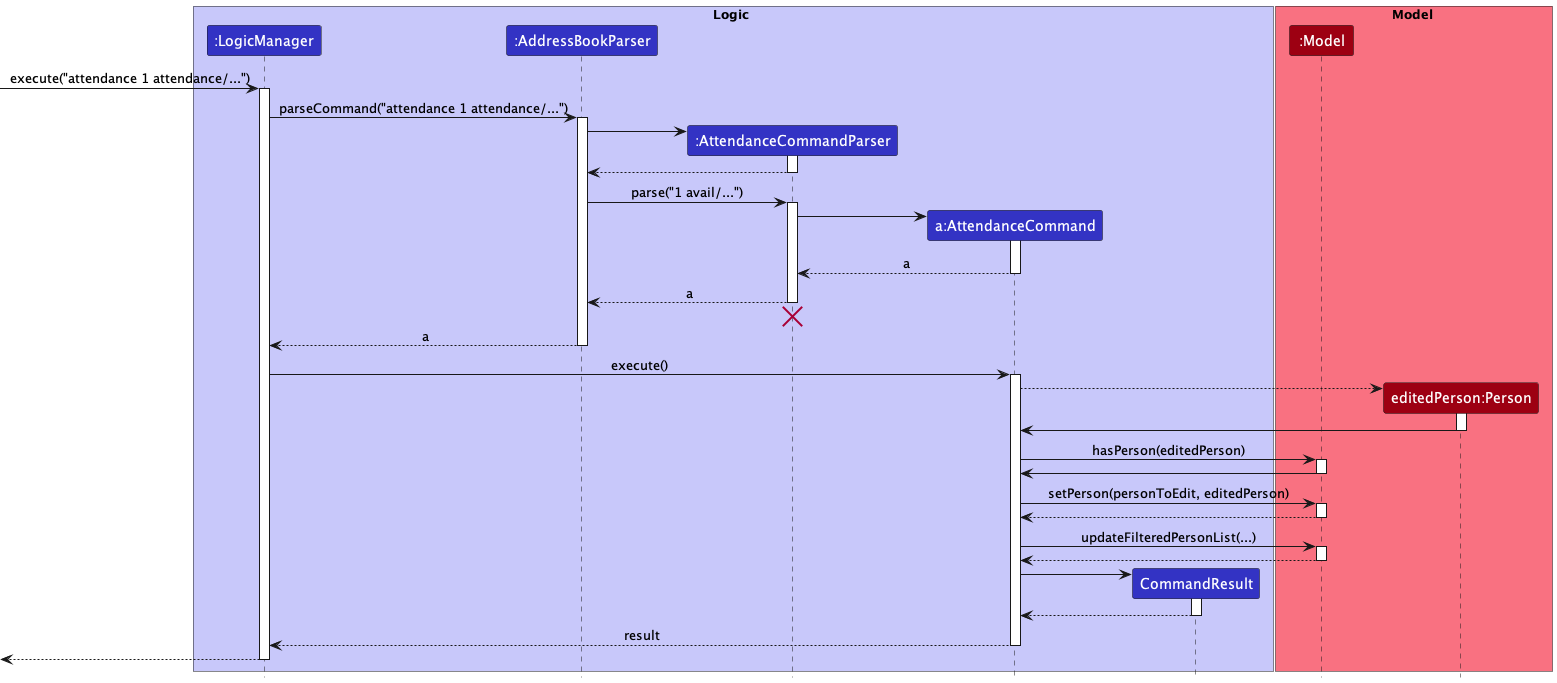
The addition of attendance of a Student in TAB is facilitated by AttendanceCommand and AttendanceCommandParser.
Implementation
- The user input to add the attendance of a student in TAB, is passed to and executed by
LogicManager, which callsAddressBookParser#parseCommandto instantiate aAttendanceCommandParser. - The
AttendanceCommandParser#parsewill return aAttendanceCommand, provided the user input is valid. -
LogicManagerwill then call theCommand#executemethod ofAttendanceCommand. - The internals of
AttendanceCommandcreates a newStudentwith the updatedattendance. - A
Personobject is created with theStudentobject asposition, and replaces thePersonto be edited in theAddressBook. through theModel#setPersonmethod. - Upon successful execution of the command, a message will be displayed to the user, by returning a
CommandResulttoLogicManager.
The sequence diagram below illustrates how the command to add attendance works:
Adding assignments to all students
The addition of assignments in TAB is facilitated by AddAssignmentsCommand and AddAssignmentsCommandParser.
This feature allows assignments with weightages to be added to each Student in TAB. Weightages are separated from the assignment name with the prefix: w/
Implementation
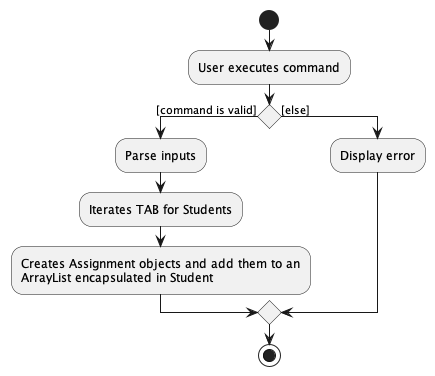
The AddAssignmentsCommandParser parses the user input to check the validity of the Assignment. Then, every Student currently listed in TAB will be assigned these Assignments. This is done with the help of the following methods:
-
Student#addAssignmentAdds a single Assignment into theArrayList<Assignment> -
Student#setAssignmentsAdds every Assignment in the user input intoArrayList<Assignment>
Listed below are the possible scenarios as well as the behavior of the feature in each scenario.
Scenario 1: User inputs assignments with weightage that does not add up to 100%
e.g. assignments assignments/ Assignment 1 w/50, Finals w/40
It will be detected that the weightage of the assignments does not add up to 100 and a CommandException is thrown
Scenario 2: User inputs assignments with negative weightage
e.g. assignments assignments/ Assignment 1 w/-50, Midterms w/50, Finals w/100
It will be detected that a particular assignment has a negative weightage and a CommandException is thrown
Given below is an example usage scenario and how the Add Assignments mechanism behaves at each step.
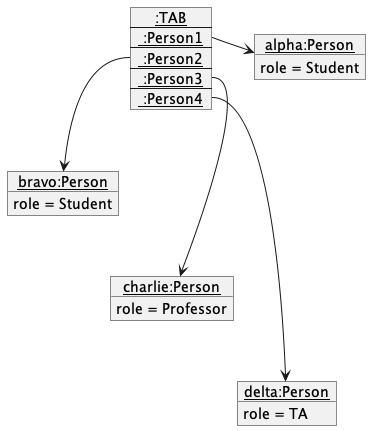
Step 1. The user launches the application. TAB will initially display all Persons
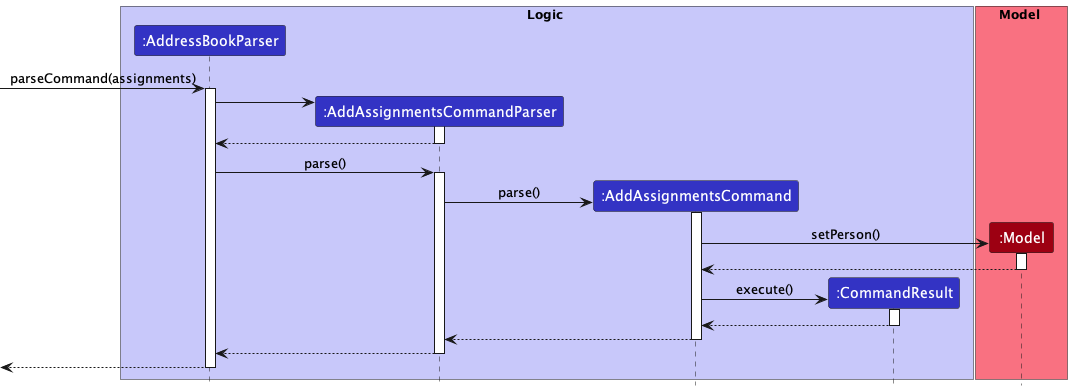
Step 2. The user executes assignments assignments/ Assignment 1 w/15, Assignment 2 w/15, Midterms w/20, Finals w/50. The assignments keyword
causes AddressBookParser#parseCommand() to call AddAssignmentsCommandParser#parse(). This returns a AddAssignmentsCommand
Step 3. The internals of AddAssignmentCommand loops through all the people in the list, checking if they have the position of student
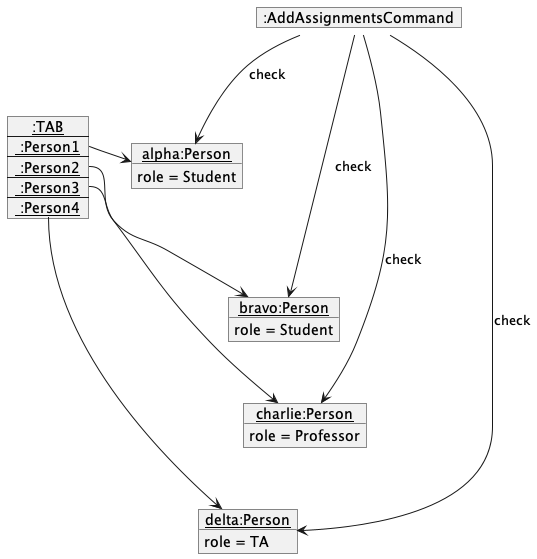
Step 4. Assignment objects will be created according to the user input and added to the assignmentsList field in Student
The following sequence diagram shows how the AddAssignments operation works:
The following activity diagram summarizes what happens in AddressBookParser when a user executes a AddAssignment command:
Design considerations:
Aspect: How AddAssignments executes:
- Alternative 1: Only adds assignments to indexed student
- Pros: Each student can have different assignments
- Cons: Will be tedious when there is a large number of students in
TAB
- Alternative 2: Save Assignments in a json file to be read so every student added after will be automatically instanciated with those assignments
- Pros: Eliminates the need to run AddAssignments command for new students
- Cons: Difficulty in implementation
Adding the grade of a student
Implementation
The proposed add grade feature is facilitated by GradeCommand which extends Command with an index of the student, an index of the assignment, and a grade to be stored.
It overwrites the following operations:
-
GradeCommand#execute()- Executes the command, storing the given grade of an assignment of a specified student. -
GradeCommand#equals(Object o)- Checks if two objects are equal.
A GradeCommandParser facilitates the parsing of the user input. It implements Parser<GradeCommand>.
After the command is parsed, the given grade is stored inside the Assignment of the specified Student. This is done with the help of the following methods:
-
Student#updateOverallGrade(Index indexOfAssignment, Sting Grade)- CallssetAssignmentGrade()with the given index and grade, and update the overall grade of theStudent. -
Student#setAssignmentGrade(Index indexOfAssignment, String grade)- Checks whether the index of the assignment is valid. If so, callssetGrade()of the correspondingAssignmentwith the given grade. -
Assignment#setGrade(String grade)- Stores the given grade inside theAssignment.
Given below is an example usage scenario and how the add grade feature behaves at each step.
Step 1. The user launches the application. The AddressBook will initially display all Persons with their Positions.
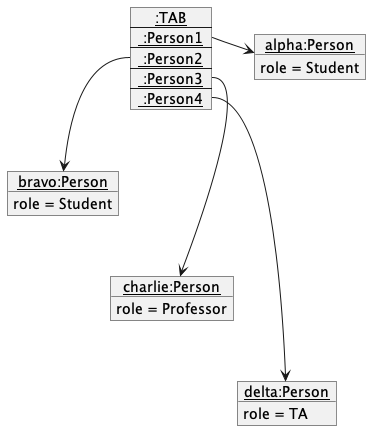
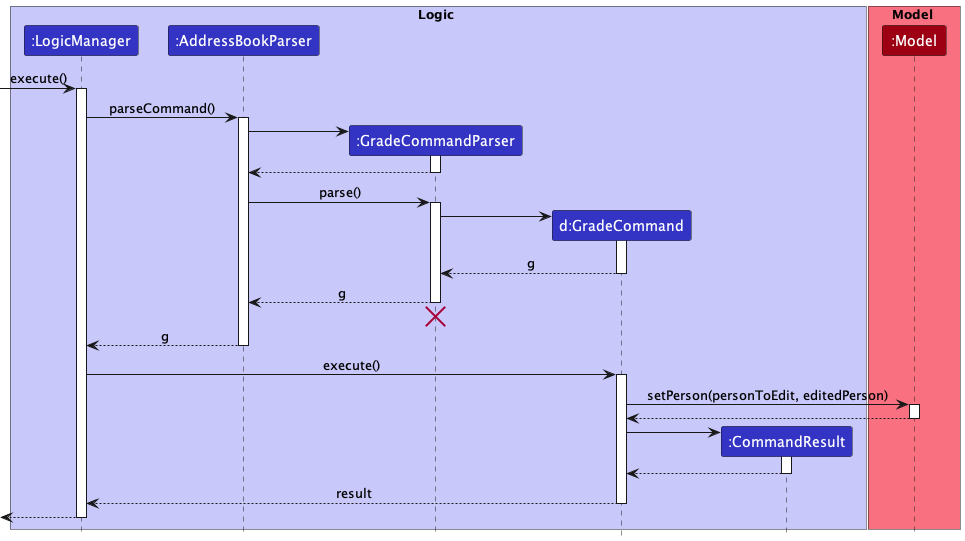
Step 2. The user executes grade 1 assignment/1 grade/86/100. The grade keyword causes AddressBookParser#parseCommand() to call GradeCommandParser#parse(). This returns a GradeCommand.

Step 3. The grade of the specified Assignment is added.
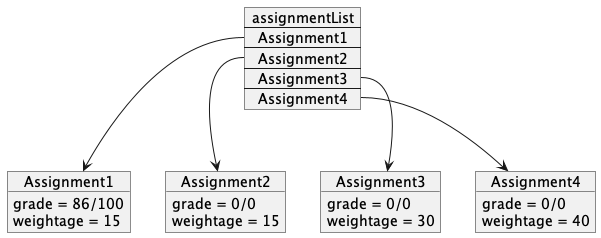
Step 4. The internals of GradeCommand creates a new Student with the updated overallGrade and assignmentList.
Step 5. A Person object is created with the Student object as position, and replaces the Person to be edited in the AddressBook.
Step 6. The AddressBook displays the updated list of Person.
The following sequence diagram shows how the add grade operation works:
Design considerations:
-
Alternative 1 (current choice):
Student#updateOverallGrade()callsStudent#setAssignmentGrade()and returns the updated overall grade of the student- Pros: The updated
overallGradecan be easily used to create the newStudentobject. - Cons: Can be confusing as in whether the
assignmentsListof theStudentis updated as well.
- Pros: The updated
-
Alternative 2:
Student#updateOverallGrade()does not return a value and only handle the calculation of the overall grade with the updatedassignmentsListprovided- Pros: Separates the operations done on the
overallGradeand theassignmentsList. - Cons: The updated
overallGradeandassignmentsListare not available for creating newStudentobject.
- Pros: Separates the operations done on the
Editing the availability of a TA
The addition of availability of a TeachingAssistant in TAB is facilitated by AvailabilityCommand and AvailabilityCommandParser.
Implementation
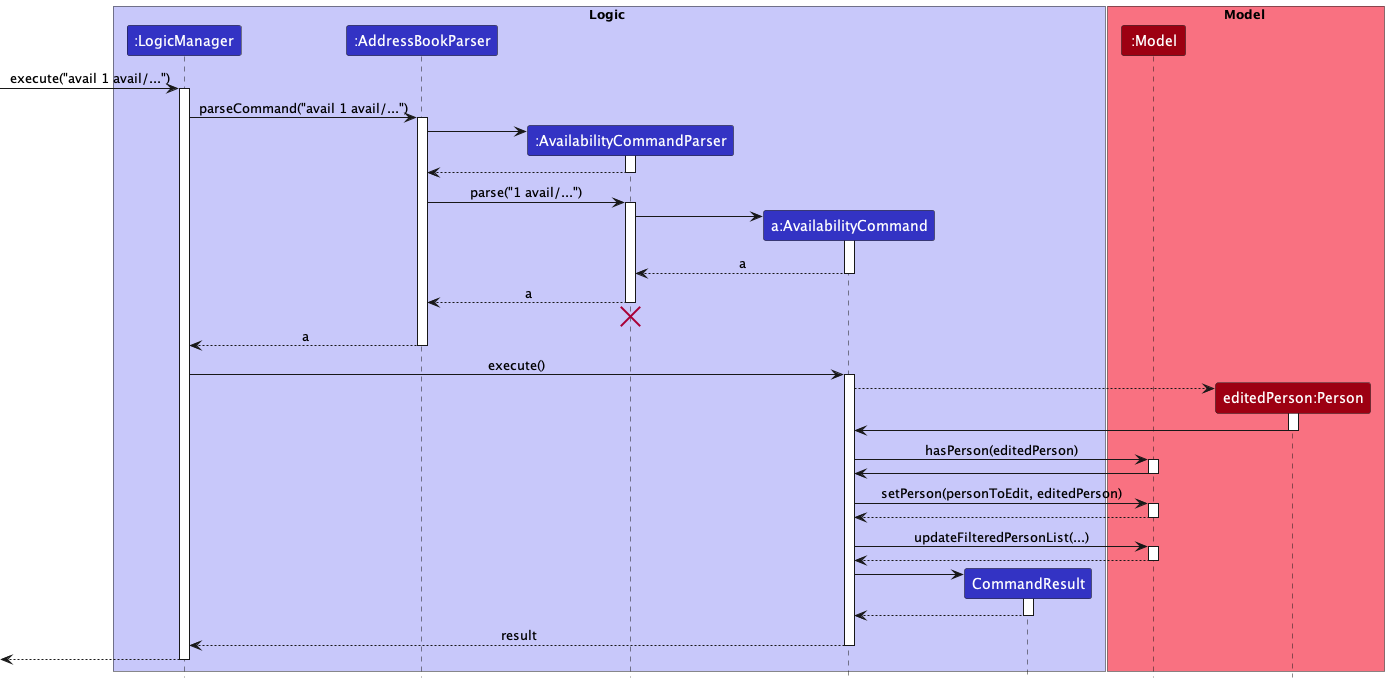
- The user input to add the availability of a TA in TAB, is passed to and executed by
LogicManager, which callsAddressBookParser#parseCommandto instantiate aAvailabilityCommandParser. - The
AvailabilityCommandParser#parsewill return aAvailabilityCommand, provided the user input is valid. -
LogicManagerwill then call theCommand#executemethod ofAvailabilityCommand. - The internals of
AvailabilityCommandcreates a newTeachingAssistantwith the updatedavailability. - A
Personobject is created with theStudentobject asposition, and replaces thePersonto be edited in theAddressBook. through theModel#setPersonmethod. - Upon successful execution of the command, a message will be displayed to the user, by returning a
CommandResulttoLogicManager.
The sequence diagram below illustrates how the command to add availability works:
Editing the roles of a Professor
The addition of roles of a Professor in TAB is facilitated by RolesCommand and RolesCommandParser.
Implementation
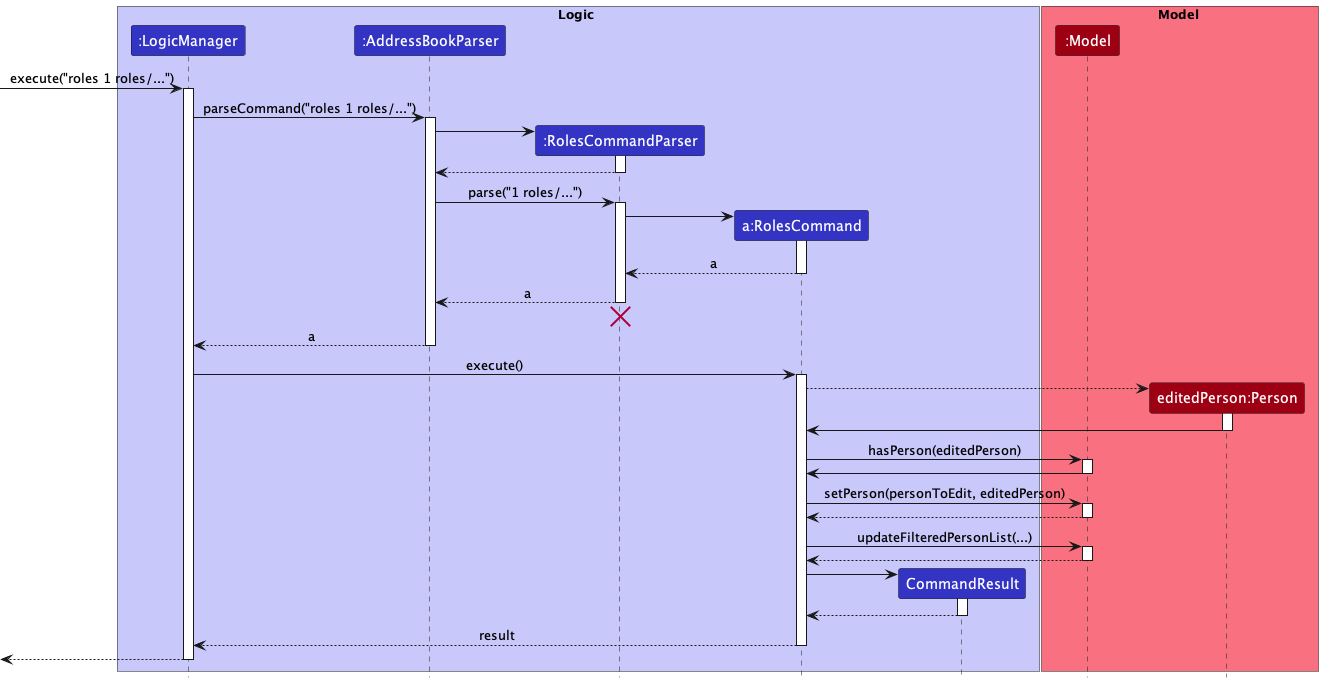
- The user input to add the availability of a TA in TAB, is passed to and executed by
LogicManager, which callsAddressBookParser#parseCommandto instantiate aRolesCommandParser. - The
RolesCommandParser#parsewill return aRolesCommand, provided the user input is valid. -
LogicManagerwill then call theCommand#executemethod ofRolesCommand. - The internals of
RolesCommandcreates a newProfessorwith the updatedrole. - A
Personobject is created with theProfessorobject asposition, and replaces thePersonto be edited in theAddressBook. through theModel#setPersonmethod. - Upon successful execution of the command, a message will be displayed to the user, by returning a
CommandResulttoLogicManager.
The sequence diagram below illustrates how the command to add roles works:
Filter by tutorial group
Implementation
The filtering feature is facilitated by FilterCommand. It extends Command with a checking predicate, stored internally as a TagContainsKeywordPredicate. It overwrites the following operations:
-
FilterCommand#execute()— Executes the command, filtering the list of people according to whether they have a matching tag. -
FilterCommand#equals(Object o)— Checks if two objects are equal.
Given below is a Class Diagram of this feature.

Given below is an example usage scenario and how the filtering mechanism behaves at each step.
Step 1. The user launches the application. The AddressBook will initially display all Persons.
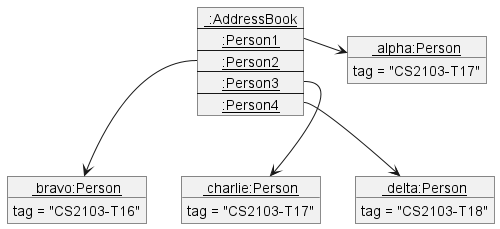
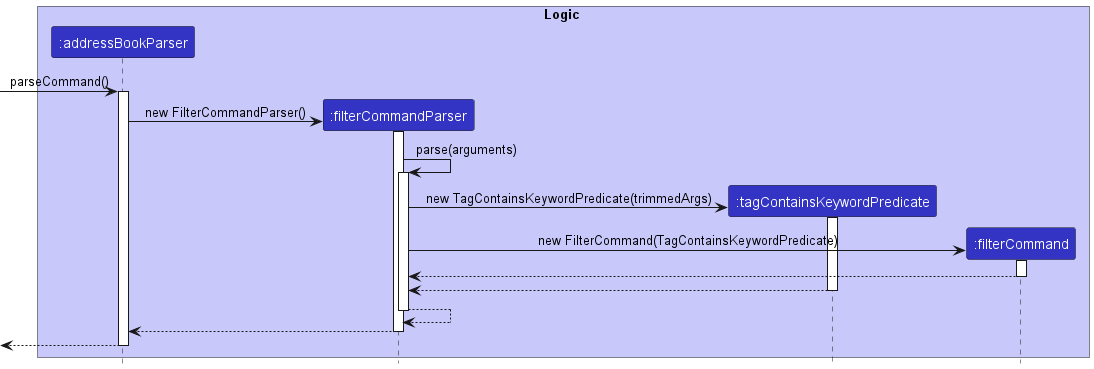
Step 2. The user executes filter CS2103-T17 command to filter people that have the CS2103-T17 tag. The filter keyword causes AddressBookParser#parseCommand() to call FilterCommandParser#parse(). This creates a TagContainsKeywordPredicate with the keyword CS2103-T17, and returns a FilterCommand containing this predicate.

Step 3. Model then loops through all people in the list, checking if they have a CS2103-T17 tag.
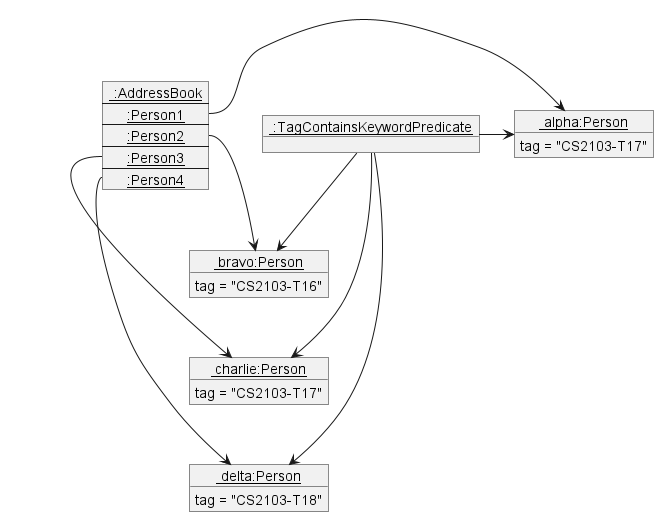
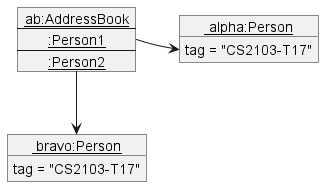
Step 4. The filtered list will then be displayed to the user.
The following sequence diagram shows how the filter operation works:
UndoCommand should end at the destroy marker (X) but due to a limitation of PlantUML, the lifeline reaches the end of diagram.
The redo command does the opposite — it calls Model#redoAddressBook(), which shifts the currentStatePointer once to the right, pointing to the previously undone state, and restores the address book to that state.
currentStatePointer is at index addressBookStateList.size() - 1, pointing to the latest address book state, then there are no undone AddressBook states to restore. The redo command uses Model#canRedoAddressBook() to check if this is the case. If so, it will return an error to the user rather than attempting to perform the redo.
Step 5. The user then decides to execute the command list. AddressBook removes the filter, showing all persons.

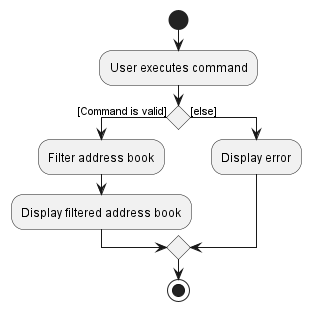
The following activity diagram summarizes what happens in AddressBookParser when a user executes a filter command:
Design considerations:
Aspect: How filter executes:
-
Alternative 1 (current choice): Updates the displayed list by hiding information.
- Pros: Uses less memory
- Cons: May have performance issues in terms of memory usage.
-
Alternative 2: Creates a new Address Book.
- Pros: Does not modify the master address book.
- Cons: May have performance issues in terms of memory usage.
Display details of contacts in secondary panel
Implementation
This feature is facilitated by ShowCommand, which extends Command with an index, stored internally as index.
It overwrites the following operations:
-
ShowCommand#execute()— Executes the command, displaying the details of the contact at the specified index. -
ShowCommand#equals(Object o)— Checks if two objects are equal.
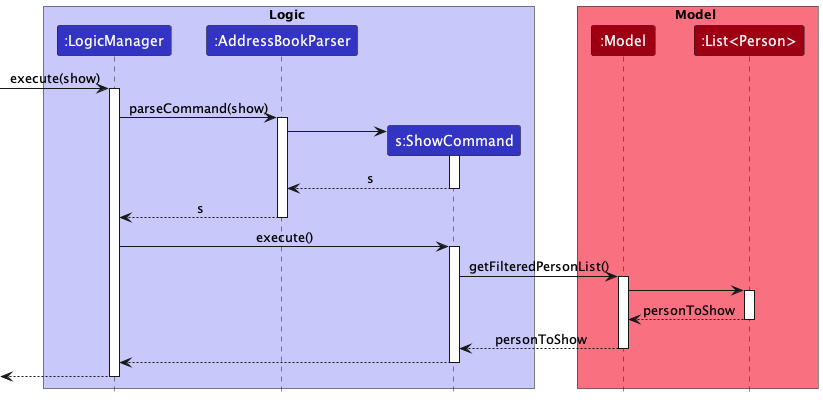
Given below is an example usage scenario and how the displaying mechanism behaves at each step.
Step 1. The user launches the application. The AddressBook will initially display all Persons with their Positions.
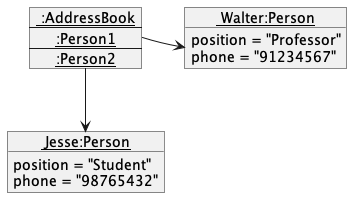
Step 2. The user executes show 1 command to display the details of the first contact shown. The show keyowrd causes
AddressBookParser#parseCommand() to call ShowCommandParser#parse(). This returns a ShowCommand containing the
index 1.
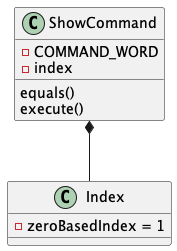
Step 3. Model retrieves the Person object located at index 1. This returns a CommandResult containing the Person
object.
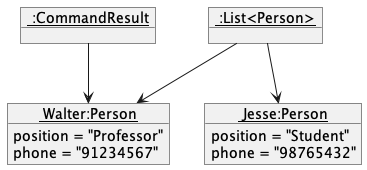
Step 4. MainWindow from UI component will process the CommandResult and display the details found inside the
included Person object.
The following show diagram shows how the show operation works:
Design Considerations
-
Alternative 1 (current choice): Passing
Personobject toMainWindow- Pros: Reduced coupling throughout the program
- Cons: Changing of many method signatures, unintuitive to implement at first.
-
Alternative 2: Passing
indextoMainWindowto retrieve details fromModel- Pros: More intuitive to implement in the sense that only
MainWindowwould be primarily modified. - Cons: Increased coupling, violation of Law of Demeter.
- Pros: More intuitive to implement in the sense that only
Multiple Teacher’s Address Books (TABs)
Feature Summary
- Users are able to create multiple TABs (currently limited to 5).
- Through
newcommand
- Through
- Users are able to swap between the TABs
- Through
swapcommand
- Through
Implementation
Current implementation consists of two parts. First part is creating new books, second part is swapping between books.
Creating new Books
This feature builds on MainWindow class to facilitate communication between the UI and backend functions. It
communicates with Logic to create new TABs and uses Model class to alter the current UserPref instance.
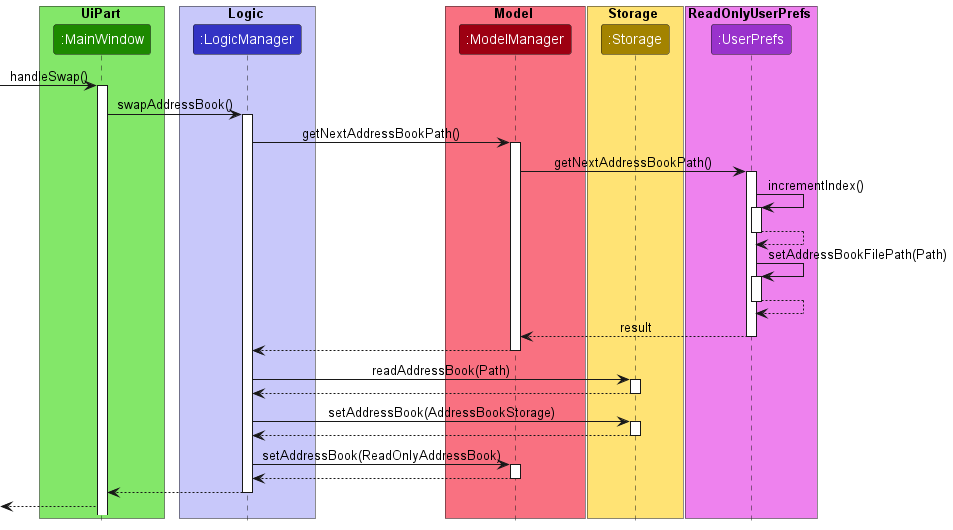
Swapping between Books
This feature, similar to creating new TABs builds on MainWindow class and communicates with Logic class to swap
between TABs. It uses Model class to fetch the next TAB from UserPref. The TABs’ information are stored as an
array under preferences.json as well as the current TAB’s index. UserPref loops around the array when it reaches
the end. Logic then make use of the path information to call storage to update the current TAB.
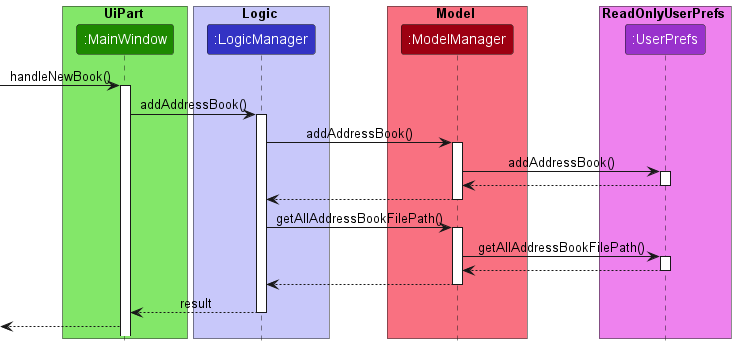
Example Given below is an example usage scenario and how the creation of new TAB mechanism behaves at each step.
Step 1: User enters the new command into the Command-Line Interface (CLI) or user navigates via Files -> New Book to
create a new TAB.
The following sequence diagram shows how creation of new book work:
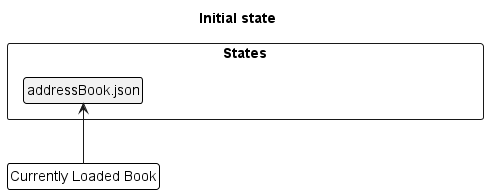
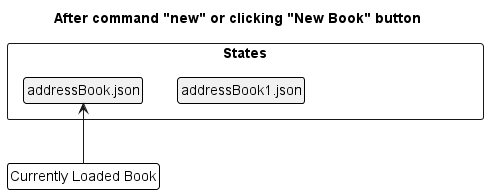
Step 1.1: User adds X amount of TABs (up to 5):
Step 2: User enters the swap command or navigates via Files -> New Book to toggle between TABs:
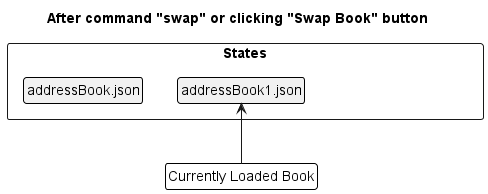
The following sequence diagram shows how swapping works:
NOTE: Sequence Diagram Only includes added portions
Design Considerations
- Alternative 1 (current choice): Toggle between books
- Pros:
- Swapping between TAB occurs within 1 window
- Open for future features
- Cons:
- Might be more prone to bugs due to complex implementations
- Might be slower to load between books
- Pros:
- Alternative 2: Multiple copies of .java applications
- Pros
- Easier to implement
- Can have multiple books open at once
- Cons:
- User need to create multiple books
- Less open to future feature extensions (communicate between books)
- Pros
Documentation, logging, testing, configuration, dev-ops
Appendix: Requirements
Product scope
Target user profile:
- Teaching Staff, either a Teaching Assistant or a Professor
- Teaches multiple classes simultaneously
- Has a need to manage the contacts of their students
- Requires to filter their students/contacts by their classes
- Prefers to filter and profile their students/contacts through other information
Value proposition: Customizing their focus to each student’s needs
User stories
Priorities: High (must have) - * * *, Medium (nice to have) - * *, Low (unlikely to have) - *
| Priority | As a … | I want to … | So that I can… |
|---|---|---|---|
* * * |
Teaching Assistant | store all my student’s contacts in one place | easily contact whoever needs to be contacted. |
* * * |
Teaching Assistant | remove student contacts who dropped the module | have an updated address book for the current semester |
* * * |
Teaching Assistant | view the performance of students | know who is doing well and who needs more help |
* * * |
Professor | store all my TAs’ contacts in one place | know who to contact should I need help |
* * * |
Professor | view the availability of the TAs | I know who to reach out to should one be unavailable to teach due to medical reasons. |
* * * |
Professor | remove contacts of TAs from my address book when they are no longer a TA | my address book is updated for the current semester |
* * * |
New User | view the summary of all commands | know the features of TAB |
* * * |
New User | go through a tutorial to get started. | understand how to use TAB |
{More to be added}
Use cases
(For all use cases below, the System is the Teachers Address Book (TAB) and the Actor is the user, unless specified otherwise)
Use case: UC01 - Delete a person
MSS
- User requests to list persons
- TAB shows a list of persons
- User requests to delete a specific person in the list
-
TAB deletes the person
Use case ends.
Extensions
-
2a. The list is empty.
Use case ends.
-
3a. The given index is invalid.
-
3a1. TAB shows an error message.
Use case resumes at step 2.
-
Use case: UC02 - Add a person
MSS
- User enters the command to add a particular person.
-
TAB shows that the command is successful and displays the added person.
Use case ends.
Extensions
- 1a. The given student details are invalid.
- 1a1. TAB shows an error message.
Use case resumes at step 1.
Use case: UC03 - Edit a person’s details
MSS
- User enters the command to edit a particular person’s details.
-
TAB shows that the command is successful and displays the edited person.
Use case ends.
Extensions
- 1a. The new student details are invalid.
- 1a1. TAB shows an error message.
Use case resumes at step 1.
- 1b. The given index is invalid.
- 1b1. TAB shows an error message.
Use case resumes at step 1.
Use case: UC04 - Show details of a person
MSS
- User requests to view details of a person.
-
TAB shows the details of the specified person.
Use case ends.
Extensions
-
1a. The given index is invalid.
-
1a1. TAB shows an error message.
Use case resumes at step 1.
-
Use case: UC05 - Add remarks of a person
MSS
- User enters the command to input a remark on a specific person.
-
TAB shows that the command is successful and displays the edited person.
Use case ends.
Extensions
-
1a. The given index is invalid.
-
1a1. TAB shows an error message.
Use case resumes at step 1.
-
Use case: UC06 - Edit attendance of a student
MSS
- User enters the command to edit attendance of a student.
-
TAB shows that the command is successful and displays the edited student.
Use case ends.
Extensions
-
1a. The given index is invalid.
-
1a1. TAB shows an error message.
Use case resumes at step 1.
-
-
1b. The person at the given index is not a student.
-
1b1. TAB shows an error message.
Use case resumes at step 1.
-
-
1c. The new attendance details are invalid.
-
1c1. TAB shows an error message.
Use case resumes at step 1.
-
Use case: UC07 - Add assignments to all students
MSS
- User enters the command to add assignments to all students.
-
TAB shows that the command is successful and displays assignments in the students’ details.
Use case ends.
Extensions
-
1a. The new assignment details are invalid.
-
1a1. TAB shows an error message.
Use case resumes at step 1.
-
Use case: UC08 - Edit the grade of a student
MSS
- User enters the command to edit the grade of an student’s assignment.
-
TAB shows that the command is successful and displays the updated student details.
Use case ends.
Extensions
-
1a. The given index of the person and/or assignment is invalid.
-
1a1. TAB shows an error message.
Use case resumes at step 1.
-
-
1b. The person at the given index is not a student.
-
1b1. TAB shows an error message.
Use case resumes at step 1.
-
-
1c. The new grade details are invalid.
-
1c1. TAB shows an error message.
Use case resumes at step 1.
-
Use case: UC09 - Edit the availability of a TA
MSS
- User enters the command to edit the availability of a TA.
-
TAB shows that the command is successful and displays the updated TA’s details.
Use case ends.
Extensions
-
1a. The given index is invalid.
-
1a1. TAB shows an error message.
Use case resumes at step 1.
-
-
1b. The person at the given index is not a TA.
-
1b1. TAB shows an error message.
Use case resumes at step 1.
-
-
1c. The new availability details are invalid.
-
1c1. TAB shows an error message.
Use case resumes at step 1.
-
Use case: UC10 - Edit the roles of a Professor
MSS
- User enters the command to edit the roles of a Professor.
-
TAB shows that the command is successful and displays the updated Professor’s details.
Use case ends.
Extensions
-
1a. The given index is invalid.
-
1a1. TAB shows an error message.
Use case resumes at step 1.
-
-
1b. The person at the given index is not a Professor.
-
1b1. TAB shows an error message.
Use case resumes at step 1.
-
-
1c. The new role details are invalid.
-
1c1. TAB shows an error message.
Use case resumes at step 1.
-
Use case: UC11 - Find persons by name
MSS
- User enters the command to find specific persons by name.
-
TAB shows that the command is successful and displays the matching persons.
Use case ends.
Extensions
-
1a. The given name is invalid.
-
1a1. TAB shows an error message.
Use case resumes at step 1.
-
{More to be added}
Non-Functional Requirements
- Should work on any mainstream OS as long as it has Java
11or above installed. - Should be able to hold up to 1000 students or TAs without a noticeable sluggishness in performance for typical usage.
- All user operations should complete within 2 seconds.
- A user with above average typing speed for regular English text (i.e. not code, not system admin commands) should be able to accomplish most of the tasks faster using commands than using the mouse.
- Unauthorised users can only read data without modifying anything.
Glossary
- Mainstream OS: Windows, Linux, Unix, OS-X
- Private contact detail: A contact detail that is not meant to be shared with others
- Authorised Users: Professors and Teaching Assistants handling their respective modules
Appendix: Instructions for manual testing
Given below are instructions to test the app manually.
Launch and shutdown
-
Initial launch
-
Download the jar file and copy into an empty folder
-
Double-click the jar file Expected: Shows the GUI with a set of sample contacts. The window size may not be optimum.
-
-
Saving window preferences
-
Resize the window to an optimum size. Move the window to a different location. Close the window.
-
Re-launch the app by double-clicking the jar file.
Expected: The most recent window size and location is retained.
-
-
Saving which TAB the user exited
-
Create a couple of TABs
-
Swap to the desired TAB
-
Exit and relaunch the application Expected: The most recent TAB is opened.
-
-
Exiting
-
Launch TAB
-
Enter into the command box
exitor click the cross button at the top right corner Expected: Application closes.
-
Deleting a person
-
Deleting a person while all persons are being shown
-
Prerequisites: List all persons using the
listcommand. Multiple persons in the list. -
Test case:
delete 1
Expected: First contact is deleted from the list. Details of the deleted contact shown in the status message. Timestamp in the status bar is updated. -
Test case:
delete 0
Expected: No person is deleted. Error details shown in the status message. Status bar remains the same. -
Other incorrect delete commands to try:
delete,delete x,...(where x is larger than the list size)
Expected: Similar to previous.
-
Creating a new TAB
-
Creating a new TAB while there are < 5 TABs
-
Prerequisites: There are a total of < 5 TABs
-
Test case:
new
Expected: A new blank TAB is created. This is reflected at the bottom left corner of the application as a new name. -
Test case: Use the keyboard shortcut
Ctrl+Shift+N
Expected: Similar to previous. -
Other correct new commands to try:
new x(where x is any input)
Expected: Similar to previous.
-
-
Creating a new TAB after having a total of 5 TABs
-
Prerequisites: There are 5 total TABs present
-
Test case:
new
Expected: Error details shown in the status message. -
Test case: Use the keyboard shortcut
Ctrl+Shift+N
Expected: Similar to previous.
-
Swapping TABs
-
Swapping TABs while there are > 1 TABs
-
Prerequisites: > 1 TABs present
-
Test case:
swap
Expected: Swaps between TABs created. This is reflected at the bottom left corner of the application as another name and the contents present. -
Test case: Use the keyboard shortcut
Shift+Tab
Expected: Similar to previous. -
Other correct swap commands to try:
swap x(where x is any input)
Expected: Similar to previous.
-
-
Swapping TABS while there is only 1 TAB
-
Prerequisites: There 1 TAB in total
-
Test case:
swap
Expected: Nothing happens. -
Test case: Use the keyboard shortcut
Shift+Tab
Expected: Similar to previous. -
Other correct swap commands to try:
swap x(where x is any input)
Expected: Similar to previous.
-
Renaming TABs
-
Renaming with alphanumeric characters and
-and_-
Test case:
rename CS2103T
Expected: Renames the current TAB withcs2103t. This is reflected at the bottom left corner of the application as a lower cased name and keeps the name after re-launch. -
Other correct rename commands to try:
rename x(where x is any valid input)
Expected: Similar to previous.
-
-
Renaming to a file that is already present
-
Prerequisites: There is a TAB named
x(where x is any valid TAB name). There are 2 TABs. In this case, assume {TAB1} stands for the TAB namedxand {TAB2} is the current active TAB. -
Test case:
rename x
Expected: Error details shown in the status message. -
Test case: Test case:
rename X(whereXis any variation of uppercase/lowercase characters)
Expected: Similar to previous. -
Test case: Test case:
rename
Expected: Error details shown in the status message.
-
-
Renaming with invalid inputs
-
Test case: Test case:
rename
Expected: Error details shown in the status message. -
Test case: Test case:
rename x(wherexcontains any other non-alphanumeric characters than-and_)
Expected: Similar to previous.
-
Appendix: Effort
Our team discussed extensively the features we want to include in this tP. Having former TAs in our group, we seeded out problems and issues TAs might face so we would produce a product they would need and want.
One of the biggest problems we faced was how to neatly list the persons in TAB to only show what needs to be seen. We solved this by implementing one of our biggest features: the New feature, which allows users to create new addressbooks so that each addressbook can be used to store students from each module. Swapping and editing each addressbook is also fast and easy
Another one of our big features is our Assignments feature. This feature enabled users to add Assignments to each student, grade each of them individually, and view these statistics on graphs. This entire feature took weeks and a lot of group effort to complete and is one of our proudest features.
In all, our team has placed a large amount of effort to craft this specific product made for teachers and through the weeks we have learnt a lot about teamwork and software engineering practises.